18 Jan How to Replace a Door Frame?
Your door frame may show signs of wear, such as being old, rotten, warped, drafty, or just plain ugly. Replacing it can be a manageable DIY project for a determined homeowner. Assessing the condition of the frame is crucial before you begin.
One common issue that may require attention is a vertical crack above the door frame. This kind of crack can contribute to structural problems and energy inefficiency.
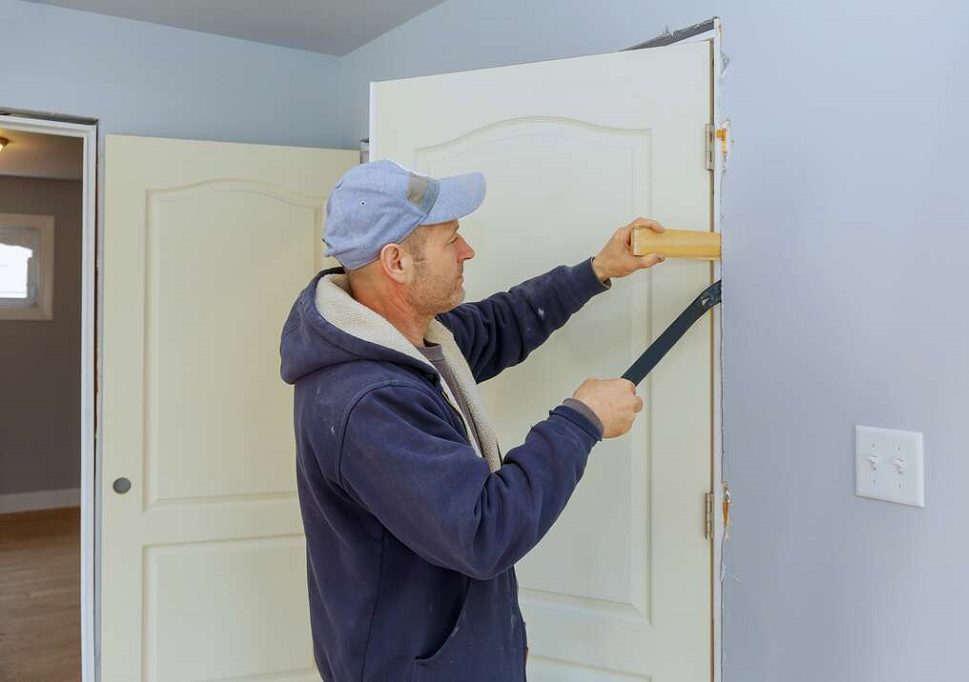
To address this, remove the trim and molding around the door frame. Use a pry bar to gently detach them, taking care not to damage the surrounding wall. Once the trim is off, you can better inspect the frame for structural damage or signs of a vertical crack. Make the necessary repairs or reinforcements before installing the new door frame. With the right tools and attention to detail, you can transform your door frame, enhancing its functionality and aesthetic appeal.
Assessing the Current Frame

Before tearing into the project, assess the current door frame. Determine if a total replacement is needed or if you can get by with spot repairs:
- Examine the frame for rotting or insect damage. Probe with a screwdriver to check if the wood crumbles. If the frame is rotten through, replacement is required.
- Check for warping by sighting down the sides and top. Minor warping can be remedied through sanding or planing, but major warping calls for replacement.
- Test for plumb and square using a level and framing square. If the frame is out of plumb, it may need to be replaced instead of repaired or adjusted.
- Look for cracks, splits, and separated joints. Anything more than superficial surface damage means frame replacement.
- Assess the weather stripping and stop molding. If missing or damaged, the frame may need replacement to fit new materials properly.
Once you’ve determined that complete frame replacement is necessary, it’s time to start preparing for the project.
Choosing the Right Replacement Frame
Home centers and hardware stores offer several options for replacement door frames:
- Pre-hung interior door units consist of a prefabricated frame with an installed door. This is the easiest option, allowing for quick replacement.
- Knock-down interior frame kits come in pieces you assemble on-site using accompanying hardware and shims. It’s more work, but it allows for custom sizing.
- Solid wood boards can be used to construct a custom door frame from scratch, trimmed, and installed piece by piece. It is the most time-consuming option but allows for the most excellent customization.
Consider the existing frame size, door style, rough opening attributes, and your skill level when selecting a replacement frame type. And don’t forget about the door itself! Pre-hung units include doors, while kits and raw boards require a separate door purchase.
Preparing the Work Area
Replacing a door frame involves some demolition. Prepare the workspace to keep things neat and safe:
- Clear furniture and other items from the immediate area. Give yourself ample working room.
- Protect nearby walls, floors, and immobile furniture with drop cloths. Things may get dusty!
- Turn off power to any switches, outlets, or fixtures in the door frame area. Safety first.
- Wear safety goggles, work gloves, and a dust mask or respirator to protect yourself as you work.
- Have all tools and materials staged nearby for quick access during the project?
Removing the Old Frame
Now comes the fun part—tearing that outdated old frame out! But take care to remove it in an orderly fashion:
- Begin by scoring the frame perimeter with a utility knife. This frees the frame from the surrounding drywall or framing.
- Pry off any trim pieces like baseboard, stop molding or casings. Retain hardware if it is in good shape.
- Locate all frame screws, nails, or other fasteners. Remove them systematically.
- Support the frame lightly as you work to remove fasteners. Don’t let it fall and sustain damage.
- Check for glue bonding frame to the wall. Break these bonds carefully with a pry bar or hammer. Work slowly.
- When fully detached, remove the old frame and immediately dispose of any rotting or insect-damaged wood.
Be mindful of adjacent walls and structures as you remove the frame. Work carefully to avoid unnecessary damage.
Prepping and Sizing the New Frame
With the old frame gone, the new one can start taking shape:
- Inspect the rough opening dimensions and verify the required sizes for the new frame. Measure multiple points to account for any imperfections.
- Confirm that the new frame is appropriately sized for the opening for pre-hung units. Adjust the rough opening if needed.
- If constructing your frame, cut boards to fit rough opening measurements, with room for shimming and plumb adjustments.
- Set the door in place in the frame to test fit. Plane or sand as needed for proper clearance and function.
- Pre-finish the door and frame with the chosen paint or stain for more accessible application before hanging. Be sure to coat all edges and cutouts.
- Mark appropriate locations and drill any necessary holes for deadbolt strikes, latches, or other hardware.
With the complete customization, it’s time to anchor the new frame.
Installing the New Frame

Here are some tips for cleanly installing a replacement door frame:
- Apply construction adhesive generously along the back edges of the frame before setting it into the rough opening.
- Align the frame vertically in the opening, using shims to make it plumb and level.
- The toenail frame was first put into place through the side jambs using galvanized finish nails. Recheck plumb.
- Drill pilot holes and insert long screws through the frame header into the wall framing above. This provides strength.
- Shim any gaps behind the jambs and secure firmly with additional finish nails. Don’t distort the frame.
- Test the frame for squareness at the top using a framing square. Adjust as needed.
- Finally, drill pilots and insert casing screws at each corner, countersunk for patching later.
- Allow adhesive to fully cure before moving on. Follow any manufacturer’s instructions.
With care and patience, the new frame will be set solidly in place, ready for trim, weatherproofing, and a fresh coat of paint or stain.
Sealing Gaps and Applying Trim
The framed opening looks bare once you remove the old casing. Fill it back in with these finishing steps:
- Seal gaps between the frame and rough opening with caulk, insulation, or backer rods to limit air infiltration.
- Cut miters and install new interior stop molding snugly around the frame opening perimeter if needed. Nail carefully.
- Measure and cut interior casing trim pieces with sharp 22.5 or 45-degree miters for clean corners.
- Pre-drill and nail casing pieces temporarily to check fit. Remove, apply adhesive, and then permanently install with finished nails.
- Install final door hardware like hinges, knobs, and strikes. Verify smooth door operation before moving on.
- Fill nail holes with putty. Sand trim lightly to smooth cut edges and remove burs.
- Apply a protective finish of paint or stain. Allow ample drying time before use.
With fresh trim in place, no one will know what hard work went into your new, beautiful door frame!
FAQs
Q: Does the new frame have to match the old one exactly?
A: Not necessarily. Feel free to alter the frame size and style if desired. Just be sure it fits the rough opening properly.
Q: Can I reuse hardware from the old frame?
A: Sometimes, if the hinges and other hardware are still in good condition. Check for compatibility with the new frame size.
Q: Do I need to take special precautions with load-bearing walls?
A: Yes. Consult a structural engineer if replacing a frame in a load-bearing wall, and follow all recommendations.
Q: What kind of saw do I need to cut the frame boards?
A: A power miter saw works best for all the angled trimming cuts required. A circular saw or handsaw can also get the job done.
Q: Should I remove the existing interior moldings before replacing the frame?
A: In most cases, yes. It allows the new frame to fit cleanly. Nail holes can be filled before reinstalling the trim.
In Conclusion
Replacing a door frame requires careful demolition, Successfully preparing your home for HVAC installation requires precision measurements, employing solid installation techniques, and having an eye for aesthetic finish trim. However, with the right preparation and materials, it becomes a very achievable weekend project for a dedicated DIYer. The trickiest part is getting the new frame aligned, plumbed, and fastened securely into the rough opening. Take it slow and double-check your work often. And don’t be afraid to ask for help wrestling that heavy old frame out when it’s time! With attention to detail and safety, you’ll have a doorframe that looks and works like new in no time.
Sorry, the comment form is closed at this time.