21 Feb How to Clean Extractor Fan?
An extractor fan is an essential appliance found in many kitchens and bathrooms. As it removes steam, grease, odors, and condensation from the air, it can get quite dirty over time. A buildup of grime and grease can lead to poor airflow and performance, mold growth, clogged ductwork, and even fire hazards in some cases. That’s why it’s important to clean your extractor fan regularly.
In this comprehensive guide, we will discuss how to clean an extractor fan.
Benefits of Cleaning Your Extractor Fan

Keeping your extractor fan clean provides several important benefits:
- Improves airflow and suction power – When free of grease and dirt buildup, the fan blades can spin faster and move air more efficiently. This keeps your kitchen or bathroom well-ventilated.
- Removes odors – Grease and grime absorb cooking and bathroom odors over time. Regular cleaning keeps smells from being recirculated.
- Prevents mold – Dirt and moisture that accumulates can lead to mold growth in vents and ductwork. Cleaning helps inhibit this.
- Reduces fire hazard – Built up grease is highly flammable. Keeping fans clean reduces the risk of a fire.
- Saves money – Well-maintained fans use less energy and last longer, avoiding the need for expensive repairs or replacement.
- Improves overall hygiene – Cleaning fans reduces the spread of bacteria and allergens that dirty vents circulate.
How Often Should You Clean an Extractor Fan?
Most experts recommend cleaning your extractor fan every 2-3 months. Kitchen fans will need more frequent cleaning than bathroom fans, especially if you do a lot of frying, sautéing, or grilling that produces more grease.
Signs that your extractor fan needs cleaning include:
- Visible buildup of grease or dirt on the fan blades and vents
- Noticeable decrease in air suction and flow
- Strange odors coming from vents when turned on
- Excess moisture accumulation around vents
- Increased dust or allergens in your home
- Louder noise coming from the fan motor
If you notice these warning signs, it’s time to give your extractor fan a thorough cleaning.
What You’ll Need to Clean an Extractor Fan
Before getting started, assemble the following cleaning supplies:
- Microfiber cloths
- Old toothbrush or other small brush
- Cotton swabs
- Mild detergent or degreaser spray
- Household rubber gloves
- Small bucket or spray bottle
- Step stool or ladder
- Vacuum with hose and brush attachments
- Flashlight
- Replacement filters (if needed)
Avoid using harsh chemicals or abrasive tools that could damage the fan. It’s also a good idea to turn off power to the fan at your home’s circuit breaker while cleaning.
Step-by-Step Guide to Cleaning an Extractor Fan
Follow these steps to thoroughly clean your kitchen or bathroom extractor fan:
1. Remove Fan Covers
- Use a step stool or ladder to reach the fan housing.
- Locate any screws or clips holding the fan covers in place.
- Carefully remove the fan grille and/or other covers and set aside.
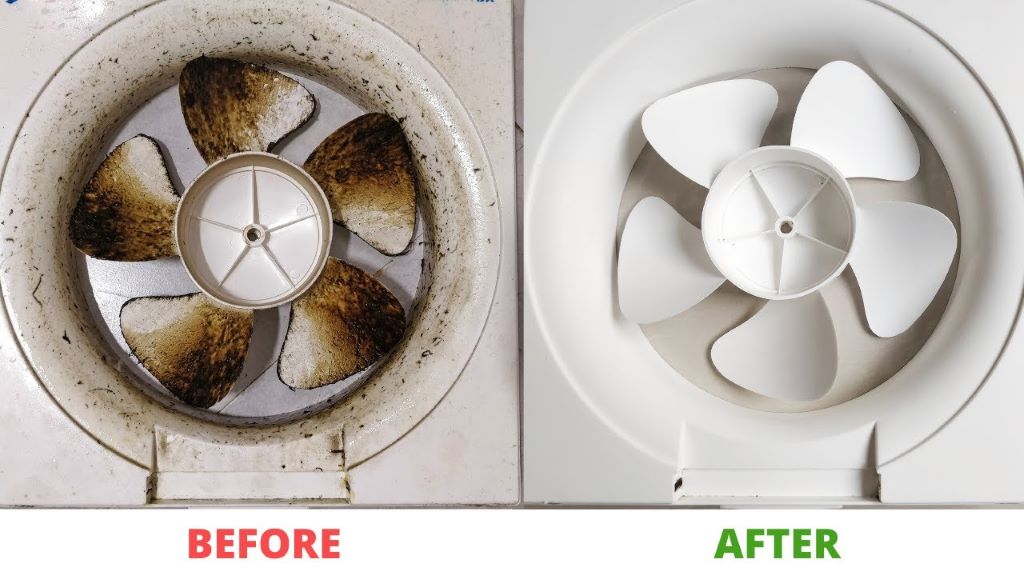
2. Clean Fan Blades
- Check if the fan blades can be removed. If so, detach them for easier cleaning.
- Use a degreaser spray and microfiber cloth to wipe both sides of each blade.
- For stubborn grease, let the degreaser soak for 5-10 minutes before scrubbing.
- Rinse blades with clean water and thoroughly dry.
- Vacuum around the motor to remove dust buildup.
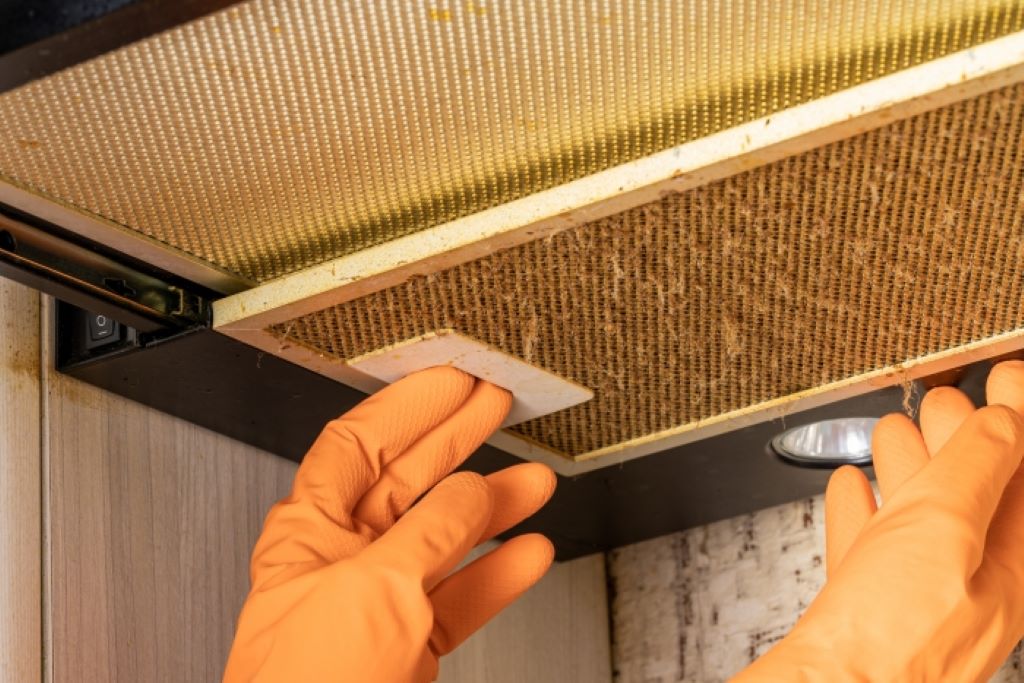
3. Clean Fan Housing
- Use a small brush or cotton swabs to dislodge dirt from nooks and crannies.
- Spray inside the housing with degreaser. Let sit briefly then scrub with a microfiber cloth.
- Rinse the housing well with clean water to remove all detergent residue.
- Let the fan housing air dry fully before reassembling.
4. Clean Vents and Ducts
- Remove the vent cover plate and use a flashlight to inspect ducts.
- Attach your vacuum’s hose and use the brush attachment to clear dust buildup.
- For grease in vents, use degreaser and scrub with small brush. Rinse well.
- Clean the vent cover last and reattach when done.
5. Clean Surrounding Areas
- Wipe down any cabinets, walls or ceilings around the fan.
- Clean under the fan housing by the exhaust opening.
- Remove built up grease around the outlet to outdoor vents.
6. Replace Filters
- If your extractor fan uses filters, remove old ones.
- Clean any reusable filters or replace disposable ones.
- Reinsert filters properly in housing.
7. Reassemble Fan
- Replace cleaned blades (if removable) and any other parts.
- Secure all covers, grilles, and vent plates.
- Restore power supply to fan.
- Test it out and observe airflow.
With a thorough cleaning of all components, your extractor fan should now run like new! Be sure to make this deep cleaning part of your regular home maintenance every few months.
Tips for Cleaning an Extractor Fan
Follow these tips for an effective, safe extractor fan cleaning process:
- Turn off power supply before cleaning as a precaution.
- Allow all areas to dry fully before turning fan back on to prevent electrical issues.
- Use mild, non-abrasive cleaners to avoid damaging parts.
- If blades are heavily caked in grease, soak in degreaser first before scrubbing.
- For hard to reach spots, attach a brush to your vacuum hose.
- Use cotton swabs dipped in cleaner to spot-clean tight spaces.
- Wear rubber gloves to protect hands from harsh detergents.
- Rinse all components well to prevent residue buildup.
- Check ducting for any gaps or leaks while cleaning the system.
- Consider hiring an HVAC professional for duct cleaning if severely contaminated.
Precautions When Cleaning Extractor Fans
Keep these precautions in mind:
- Disconnect the unit from power supply before servicing to avoid shock.
- Allow the fan to cool completely before cleaning if it has been running.
- Do not let liquids drip into electric components.
- Do not use abrasive scrubbers or harsh chemicals that could damage parts.
- Do not lean too far into ducts, you could get stuck.
- If on a ladder, maintain stable footing and ask someone to spot you.
- Wear eye protection to avoid injury from grime and debris.
- If there is significant mold or pest contamination, it is best to call a professional service.
- Properly dispose of used filters and any debris swept up to avoid re-circulation.
Frequently Asked Questions
How can I reach the fan if it’s high up?
Use a sturdy step stool or ladder to gain safe access. Have someone spot you if using a ladder. Never lean too far or overreach. If it is too difficult to reach, consider hiring an appliance repair technician.
What if I can’t remove the fan or vent covers?
If the covers or grilles appear permanently affixed, cleaning will take a bit more effort. Use a brush attachment on your vacuum to dislodge debris through vents. Use extra long cotton swabs dipped in cleaner to wipe blades.
Why does my fan make noise when running?
Excess dirt and dust can throw off the balance of fan blades, causing wobbling that creates noise. Thorough cleaning typically solves this issue. You may need to replace worn-out bushings or bearings if cleaning does not work.
Should I oil the fan motor?
Modern fan motors are designed not to be oiled. In fact, oiling them can attract more dust and lead to problems. The motors are lubricated and sealed at the factory. Simply wiping dust and dirt off the exterior is all that is needed.
How do I know if I need a professional cleaning?
If you have a roof-mounted unit that’s difficult to access, excessive grease and grime buildup, signs of pest infestation, or contamination deep in ductwork, it’s best to hire a professional cleaner to service it thoroughly.
My fan has a funny smell even after cleaning. What should I do?
Odors after cleaning could mean there is still debris stuck or mold present. Try cleaning again with disinfectant. If the smell persists, you may need to replace filters, sanitize ductwork, or install new venting.
I have a window or wall-mounted extractor fan. How should I clean it?
- For window fans, clean the blades first with a small brush. Spray exterior housing with cleaner and wipe down.
- For wall-mounted fans, gently pull away from the wall to access the back. Clean backside and interior carefully before replacing.
- Use a vacuum crevice tool to dislodge dirt around the window or wall edges.
- Wipe all surrounding window and wall surfaces to remove grease buildup.
Are extractor fans easy to take apart and reassemble?
Most extractor fan components are designed for quick disassembly for maintenance. The blades, filters, and covers typically detach easily with basic tools like screwdrivers. Carefully study how the parts fit together before taking apart so you can properly reassemble. Consult manufacturer instructions if unsure.
What kind of degreaser is safe to use?
Look for degreasers specifically made for kitchen and bath cleaning. All-purpose cleaners work too. Test in an inconspicuous spot first. Avoid abrasive cleansers or anything with harsh chemicals like bleach that could damage the fan finish.
How do I know when filters need to be replaced?
Check filters at least every 6 months or if you notice reduced airflow. Disposable grease filters should be replaced when they appear very dirty or clogged. For charcoal filters, replace as per manufacturer recommendations, usually every 3-6 months.
Can I vacuum the fan blades instead of taking them apart?
It’s best to fully remove and detach fan blades for optimal cleaning access to both sides. Trying to vacuum around spinning blades can be dangerous. But if blades are not removable, carefully vacuuming can dislodge some surface-level dirt.
Conclusion
Performing regular extractor fan cleaning provides many important benefits beyond just improving appearance. Keeping this appliance free of grease buildup improves air quality, reduces fire hazards, extends fan lifespan, and helps prevent the growth of mold and bacteria.
While cleaning an extractor fan may take a bit of time and effort, it is a basic maintenance task any homeowner can tackle. While kitchen exhaust fans do not typically use a lot of electricity, it’s essential to maintain them properly for efficiency and safety. Just be sure to take proper safety precautions, clean all components from blades to housings to vents thoroughly, and establish a regular cleaning schedule to ensure optimal performance without significantly increasing your energy bills. With proper care, your extractor fan can continue removing odors and humidity from your kitchen or bathroom air for many years.
Sorry, the comment form is closed at this time.